Thursday, January 31, 2013

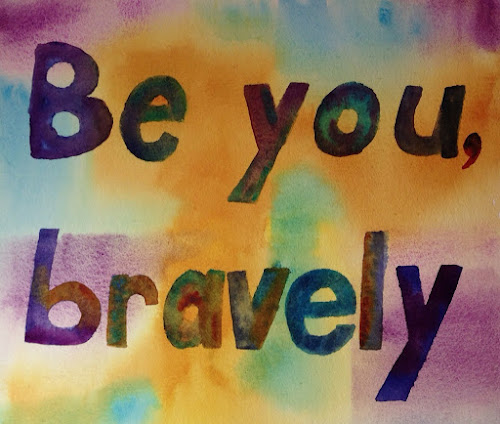
More Be You Bravely Experiments w/c on paper. 9"x12"

This experiment is watercolour paint on 300 lb watercolour paper. I wanted to see how well a mask from contact paper would work. Unfortunately, it didn't work quite so well as I had hoped. However, I later wetted the letters carefully, and included the areas where the paint bled out under the contact paper. Then I charged in watercolour paint and this is the result. I think I would be just as far ahead wetting one letter at a time freehand in script before charging in the watercolour paint. For reference, here's a photo of the letters and how they looked during my process this yesterday...

Step 1 - After the background wash

Step 2- cutting the letter mask. This was relatively easy for the block letters but script would be no picnic... and probably be less effective as the paint ran under the masks more on the curves.


Step3 - After I painted the masked letters. Messy bleeds around the first letters

Step 4 - after i expanded the letters to cover the bleeds...

Cheers!
 

Tuesday, January 29, 2013

YOU (acrylic, 12"x12")

This was a fun one, experimenting with watery acrylic on thick mat board. The paint definitely moves completely differently from what it does on watercolour paper.

First I prepared experimental "masks" using my glue gun on glass for the three words, I let that set up overnight and then carefully scraped it off the glass with a sharp paint scraper (ie razor blade). That worked relatively well. These looked like clear jellies. Kinda fun!

A
 

Then I laid in very light washes on the mat board and let the colours run around and bleed into each other. After I let them dry, I placed the letters on the mat board and used my mouth atomizer to spray thinned acrylic around them. It was fun but I wouldn't call it a resounding success. I used some opaques of the colours towards the end and I feel that deadened the colours to some extent. Still experimenting and enjoying the process!

Have a great evening everybody!


Monday, January 28, 2013

Storage Project

I have had a serious storage problem in my studio for some time. The issue of storing completed, in progress, and even new panels and canvasses has been getting worse as I have gradually been painting more, and larger. I needed a solution that didn't involve a major outlay of cash. This project cost $140 and, I'm happy with the result.

I found what I wanted on EmptyEasel.com, although the specific link eludes me as I'm writing this. Here's how I did this:

I needed:

  1. A wire shelving unit ( I bought a "Honey Can-Do" shelf from Amazon)
  2. 1/4" pegboard cut to shelf size
  3. 1/4" wooden dowels
  4. Masking tape

The steps are:

  • Assemble the wire shelf unit. Make sure shelves are going to fit your canvasses and panels. I made mine to store lighter, larger canvasses on the top two shelves and heavier items on the bottom.

  • Cut the pegboard and add to shelves
  • Insert the dowels through the pegboard holes and wire shelving vertically so that your items have a place to lean without damaging them. This step is a bearcat to say the least. First I clipped the third shelf's pegboard up onto the top shelf which looked like this...
  • Then I could run the dowels down through the wire of shelf 3 and shelf 2... Then up through the top shelf and both pegboard pieces in one go.
  • I ran 1/4" masking tape around each dowel an inch from the bottom before inserting them back down into shelf 2's pegboard.
It's very functional and I've loaded it up and taken 4 cardboard boxes out of my studio! Wow, it feels so awesome to have this organized! I plan to put dowels between the bottom and third shelf to accommodate small supports (11x14" and smaller).


Friday, January 25, 2013

Be (acrylic, (11"x14")

"People have one thing in common: They are all different". Robert Zend

Some of the simple sounding things in life are profound when you sit down to think them over. For example, " Be you, bravely" can be read as BE you, bravely, be YOU, bravely, or be you, BRAVELY. Each of these emphasizes something different.

I'm going to be painting on this topic off and on over the next week. Today i emphasized the first word. Emphasis on BE puts me in mind of action- step into it, embrace yourself, make it happen, act intentionally on yourself, assume your own identity, accept yourself as you were created...you get the picture. It's not a word suggesting standing still for me. It's about action...

This was started as a drippy, runny mix of three colours - orange, blue, and yellow. In places they've blended and run into each other, creating less intensities in the colours (complimentary colours added to each other create neutral greys, browns, etc). At the risk of push my philosophical mood too far, I think personalities reflect the same blending and the result is our uniqueness as people. Then you add in societal "shoulds", or external pressures, and we can easily end up in a muddle, not knowing how to just BE. It takes some thinking to act intentionally upon a canvas, why would life be any different? What do I want this canvas called Cheryl to become? Where am I at now? And where do I want to be? BE.


Wednesday, January 23, 2013

Sacred Hill (oil, 8"x10")

I found this painting in my pochade box storage after we unpacked here in our new home in Lloydminster. I painted it on September 24 last year on a hill in a pasture near Sundre, Alberta. Not much has changed in this spot since September 24, 2010, but there's a sense of peace in my heart now that certainly wasn't there on my two prior visits. I still miss my brother so much, but knowing he embraced his Lord for the first time here makes me so happy for him!


Tuesday, January 22, 2013

Rocky Tak Coast (oil, 10"x10")

Here's the second instalment of Rocky Tak Coast (started on January 15). Today I added the water and I think I like it so far.
 
Here's where it was this morning when I began painting...
I'm off to paint some more!!! Cheers!


Thursday, January 17, 2013

WIP Misty Matsushima (oil, 10"x10")

This one started out on mat board as a light, watery layer of acrylic, much like I did with Rocky Tak Coast. Thieves islands are just a bit north of rocky Tak in Matsushima Bay.


Once the initial wash dried, I followed up with 2 coats of GAC100 on both sides to seal it. (Apologies, this photo is too dark)!

I blocked in the land masses today with oil paint, covering most of the underpainting. Once this dries to touch, I will go back in and do the water..... blessings!


Wednesday, January 16, 2013

Box Seats (oil, 6"x6")


I haven't accomplished much in the studio today but I put a few touch ups on this little oil painting. Enjoy!


Tuesday, January 15, 2013

Rocky Tak Coast start (oil, 8"x8")

I based this painting on a photo I took near Shichigama, Miyagi prefecture in Japan in November 2011. This is a rugged coast very close to the epicentre of the earthquake and tsunami that devastated the northern coastal region of Honshu. We were there about six months after the tsunami - some of the area had yet to be cleared, and to this day has not been re-built significantly. Debris continues to wash up on beaches, in Japan, and elsewhere in the Pacific.

For those interested in my process (which I SO enjoy), heres just a bit of background.

This is the photo reference I am using.

I started this painting in acrylic and blocked in the cool and warm, light and dark areas. Here's what it looked like after the initial block in of very wet acrylic paint on this absorbent mat board. Several days ago, I covered this mat board with several layers of acrylic medium and Golden's GAC 100 to seal it well. I've painted on the bottom left half only. I'm going to let this dry before I paint the water. So far I like it! Cheers!


Saturday, January 12, 2013

Western Blaze (8"x10", Watercolor/Gouache)

I absolutely love sunsets, and love painting them too. Somehow I see watercolour as a more appropriate medium, since the sky is affected so much by water. Haha, yes, I do realize how crazy that sounds all you oil paint lovers!

Happy weekend!


Friday, January 11, 2013

Deep Falls (8"x10", w/c and gouache)

This waterfall produces some cool photo opportunities, as I discovered in 2000 on our anniversary trip to Hawaii. At that time I hadn't taken up painting. The photo was unearthed during our recent move and I thought I'd give it a go. I wish I could recall where the water falls is located! Any ideas?
 
For a watercolour, I sure got my darks DARK! However, I really like how the colours in the pool at the base of the falls turned out.
Enjoy!


Sunday, January 6, 2013

Bow Lake Sentinels (oil, 9"x12")

I loved my painting time yesterday and today and I can't wait to do more. I've missed mucking about in my paint. This was fun, most of the marks made today were done with palette knives. That's so much fun - it makes such surprising ( and sometimes alarming) marks. It requires wholesale scraping off at times, it's MESSY! If you wait too long, it's harder, sometimes impossible, to scrape down and rework. Sounds somewhat like life doesn't it? However, since oil paint takes quite a long time to dry to the touch, never lose hope :-). I'm not sure if this one is done but I'll let it dry for several days before I mess with it further.
Cheers!
 

Saturday, January 5, 2013

Bow Sentinels (work in progress, oil, 9"x12")

Ah, there's really nothing like painting to occupy the mind and emotions! I ALWAYS feel better after painting. I've had a long period of artistic inactivity, so, earlier this week I got my acrylics out and a couple of Masonite panels and just played. One of the results was this underpainting start...
I've just sketched in the basic outline of the dark areas and here it is as of today....
What a mess - the ugly duckling stage for sure! Cheers"